Getting Started with Mural: Stablecoin Payments
Join Mural Today for Free
Join Mural Today
Join Mural Today
Invoice customers and pay contractors globally
Jan 9, 2024
Jan 9, 2024
Welcome to the next installment of Mural's Getting Started series. If you haven't read our first blog, we encourage you to take a look at it here. Today, we're diving into the specifics of making a payment with Mural. Our platform is versatile, catering to various payment needs - whether it's facilitating individual payments to vendors or managing global invoices, handling batch payments for mass contractor payroll, or setting up recurring payments to manage stablecoin payroll for your full-time staff efficiently.
Make a Payment
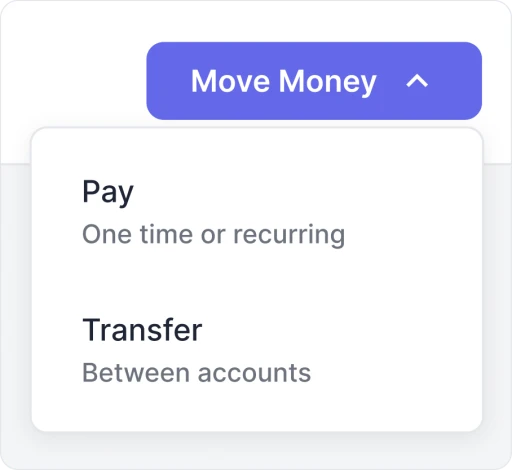
In order to make a payment you will need to load up your account, that can be done by using our Deposit feature or an external exchange from Circle's approved list. Once your Mural Account is loaded with your top stablecoin, you're all set up to experience the efficiency of Mural’s payment capabilities. You can begin the process by selecting Pay under Move Money in the top right.
Configure Payment Details
Customizing your payment on Mural is a straightforward process designed for your convenience. Start by selecting your recipients easily from your established Contacts or by entering a new address directly, which you can save for future transactions.
Next, specify the payment amount you want to send for example, $25 USDC or whichever your top stablecoin is. You will then choose which of your accounts the funds will come from and categorize your transactions with memos, attachments, or tags for detailed record-keeping. If you're scheduling payments, whether one-off or recurring, Mural's system allows for hassle-free setup. Once you've filled in the details, move forward to Submit Payment for Approval.
Approve and Send
Once your payment has been submitted for approval, it will appear on the Actions tab. This is where you will utilize your Digital Signature; using biometric verification, you will approve transactions after clicking the Approve button.
Once approved, the Send Now option is green—your cue to dispatch your first Mural transaction! Watch as your payment is confirmed within seconds and takes its place in the Transactions tab, your new ledger of financial activity.
Conclusion
That's it! You've now successfully navigated the essential steps of making a payment with Mural. This process, from loading your account to sending off the transaction, is designed to be user-friendly, secure, and efficient, aligning perfectly with our core values of speed, security, and simplicity. Whether you're handling individual payments, batch payroll, or recurring transactions, Mural streamlines these financial activities, giving you more time to focus on what matters most in your business. Stay tuned for more from our Getting Started series, where we'll continue to explore the various features and benefits of Mural, making your financial management smoother and more intuitive.
Welcome to the next installment of Mural's Getting Started series. If you haven't read our first blog, we encourage you to take a look at it here. Today, we're diving into the specifics of making a payment with Mural. Our platform is versatile, catering to various payment needs - whether it's facilitating individual payments to vendors or managing global invoices, handling batch payments for mass contractor payroll, or setting up recurring payments to manage stablecoin payroll for your full-time staff efficiently.
Make a Payment
In order to make a payment you will need to load up your account, that can be done by using our Deposit feature or an external exchange from Circle's approved list. Once your Mural Account is loaded with your top stablecoin, you're all set up to experience the efficiency of Mural’s payment capabilities. You can begin the process by selecting Pay under Move Money in the top right.
Configure Payment Details
Customizing your payment on Mural is a straightforward process designed for your convenience. Start by selecting your recipients easily from your established Contacts or by entering a new address directly, which you can save for future transactions.
Next, specify the payment amount you want to send for example, $25 USDC or whichever your top stablecoin is. You will then choose which of your accounts the funds will come from and categorize your transactions with memos, attachments, or tags for detailed record-keeping. If you're scheduling payments, whether one-off or recurring, Mural's system allows for hassle-free setup. Once you've filled in the details, move forward to Submit Payment for Approval.
Approve and Send
Once your payment has been submitted for approval, it will appear on the Actions tab. This is where you will utilize your Digital Signature; using biometric verification, you will approve transactions after clicking the Approve button.
Once approved, the Send Now option is green—your cue to dispatch your first Mural transaction! Watch as your payment is confirmed within seconds and takes its place in the Transactions tab, your new ledger of financial activity.
Conclusion
That's it! You've now successfully navigated the essential steps of making a payment with Mural. This process, from loading your account to sending off the transaction, is designed to be user-friendly, secure, and efficient, aligning perfectly with our core values of speed, security, and simplicity. Whether you're handling individual payments, batch payroll, or recurring transactions, Mural streamlines these financial activities, giving you more time to focus on what matters most in your business. Stay tuned for more from our Getting Started series, where we'll continue to explore the various features and benefits of Mural, making your financial management smoother and more intuitive.
Join Mural Today for Free
Request a Demo
Request a Demo
Featured Articles
Featured Articles
Featured Articles


Your gateway to the future of financial networks

© 2024 Mural Technologies, Inc.
Your gateway to the future of financial networks
© 2024 Mural Technologies, Inc.
Your gateway to the future of financial networks
© 2024 Mural Technologies, Inc.